
WiFi sucks. I mean, it’s awesome, in theory, but it kinda sucks, though I can’t think of an appropriate metaphor to explain why. Let’s say, it’s trying to take a drink from a sprinkler when a crowd of people are all gathered around it and fighting. Now let’s compare that to, say, a water tower, where everyone in that same crowd gets their own spigot. Everyone attaches a hose, and everyone’s happy. This latter explanation is wired Ethernet.
Okay, that was a horrible explanation, and I hate analogies. Analogies are a means to add context to an explanation when parties involved don’t have the prerequisite knowledge, but they always end up sounding like a twisted politician’s manipulative words. Anyway, as with all technical explanations, there is no shortage of people on the Internet who can explain this better, so go Google the background information if you need. As usual, my post is anecdotal, because, overly-researching a project adds to the complexity, which tends to dissuade me from even attempting it. So instead, I will simply tell you that the following project is reasonably straightforward and even an amateurish attempt will reap huge benefits.
With WiFi, you have a much more restrictive set amount of bandwidth, and that bandwidth is shared by all devices on that particular hotspot. But wait–it gets better. That hotspot is also sharing that particular range of radio spectrum with every other hotspot in range, and any other device licensed to operate within that spectrum, which is just about every wireless consumer appliance. So in practice, the general throughput you could ever hope to achieve with a hotspot is roughly a third of the theoretical maximum. 1300 Mbps? More like 450.

Also, ironically, the main point of using WiFi is for mobility, and a major problem with WiFi is in its mobility. When the connected device moves, it experiences latency. When the device switches between hotspots on the same network, there’s a delay while it renegotiates a connection. In my house, in order to cover the property in its entirety, I have 3 hotspots. Adding to the complexity is the changing technology, while maintaining legacy support, so I have 802.11b-ac, on both 2.4GHz and 5GHz bands. And, while this is all done transparently, it still experiences delays. There are commercial products that claim to handle the transition better, as do consumer “mesh” WiFi products, and I’m sure they do, but you pay for it, and for consumer use I just don’t yet find the price point cost-effective.
Additionally, mobile devices also connect to cellular data service. That means, when roaming between hotspots, the device also has to to consider whether it’s going to connect to a new hotspot, or the cellular service. Quite often I walk from my living room to the garage, go to load a podcast, and the phone says something like this:
‘Oh, we’re walking out of range of that hotspot now, guess I’ll switch to cellular, hang on a sec. Oh wait! There’s another hotspot here, but I already started negotiating an IP from the cellular network. Okay, hang on a sec, I’ll connect to this other hotspot.’
Of course, this takes only seconds, but that’s enough of an irritation when in the middle of loading something to rouse ire. Plus, in my house, whenever the Internet isn’t immediately accessible for whatever reason, it’s my fault. Worse is when the connection drops while already involved in something. I pray every time my wife loads up a Destiny raid that the connection remains stable.
And sometimes, when a device boots or wakes from sleep, it can stall while deciding on where to connect. Such was the case with the Apple TV in our bedroom. So after months of dropped connections, despite having installed a new hotspot 10 feet away, I did what I had been gradually doing throughout the house: I installed an Ethernet jack.
And this is where one would ask: “Simon, aren’t there hundreds of online guides from people with far more experience than you on how to do this?” And I would answer yes, there most certainly are. But unlike those people, this type of work is not relevant to my career, so the observations I offer are free of prejudice, as they represent no meaning to my ego. So, no lengthy arguments here about industry standards. If that’s what you’re after, shoo.
Let us begin. I will explain what I did and why. First, I acquired a 1000 ft box of CAT6, UTP, CMR, solid core Ethernet cable. Here is why I chose this:
- 1000 feet is a standard unit to purchase, easy to find, and economical in price. It seemed like a good place to start, based on my estimates.
- CAT6 is the most recent official rating for Ethernet cable. The price difference for the quantity I was purchasing was negligible, so logic dictated that I buy the more modern cable.
- UTP. This means it’s unshielded twisted pair. Technically, all Ethernet cable is twisted pair, so whatever (phone lines are twisted pair, so the tech is old, although whoever installed the land lines in my house just draped individual pairs of wire willy-nilly through the basement–that couldn’t have been very good audio fidelity). As for the shielding, well, that’s usually reserved for niche applications. I didn’t even see shielded wire available during my search.
-
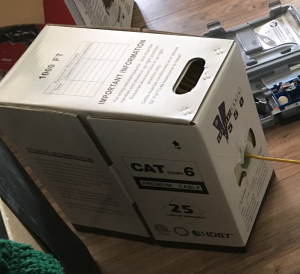
This cable has no idea how much data it’s going to carry CMR. This is the rating on the insulation. It means it’s rated for riser applications, so safe to run up through dead space into walls. The rating is for fire-retardant purposes. Plenum wire is designed for air ducts. For residential applications, I wasn’t concerned. If the basement is on fire to the point that the wires are burning, I’ll have bigger problems than how quickly the fire will eat through the wire. Google is your friend if you want the details.
- Solid core wire is the standard for Ethernet runs. Banded wire is used for patch cables. Basically, wire that doesn’t move should be solid, and wire that connects devices to jacks should be banded. Solid can break from repeated bending, apparently. I didn’t discover this until I had already crimped patch wires for every wired device. I suppose time will tell if this was a bad idea or not. But if wires break, I can always buy new.
There, that’s settled. There is no reason to further discuss wire types.
Running the wire was straightforward, and the boxes are designed for easy spooling. Simply place the box at one end of the run and pull it as needed. This comes up a lot so I’ll mention it: use no more than 25 pounds of pulling force. I suppose this means that everyone has a very accurate sense of quantifying force? I guess just avoid using it to swing like a monkey from the rafters and you should be good.
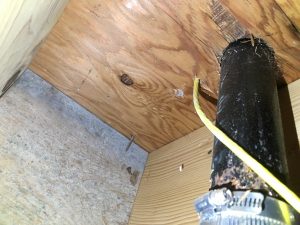
I found CAT6 passes easily through a 3/8 inch opening, so drilling is pretty simple. I also live in a ranch with a full basement, so all I had to do was measure carefully, then drill up into the wall-space from below. I can’t imagine how difficult it must be to fish this stuff through multiple stories of drywall. You’ll see in the photo where I hit the damn support beam and had to re-drill. Also the drill battery died and I had to borrow the neighbor’s. Why is a project never simple?
Once through, I drilled a rectangular hole for the box with a Dremel. CAT6 is also stiff enough that I was able to simply reach into the wall space with a hook and pull the wire out.
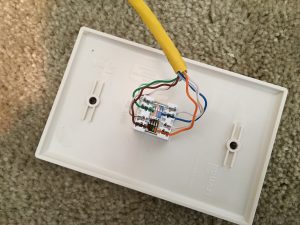
The next step was to punch down the wires into the jack. This was wonderfully simple–just follow the supplied instructions and use the included tool. Choose either the A or B configuration. Apparently B is the US standard, but A has minor advantages over B. Since I was wiring everything myself, I figured I’d go with A then. The important thing is to stick with either A or B once you start. Also, I discovered later that you’ll want to leave the wires twisted as much as possible, and that the wires are supposed to feed from the inside of the jack punches to the outside, not the other way around as I did in the photo. Maybe one day I’ll re-punch properly, but the line tested at 780+ Mbs, and seeing as the Apple TV only has a fast Ethernet NIC (100 Mbs maximum), there seemed little point to fuss over technique.
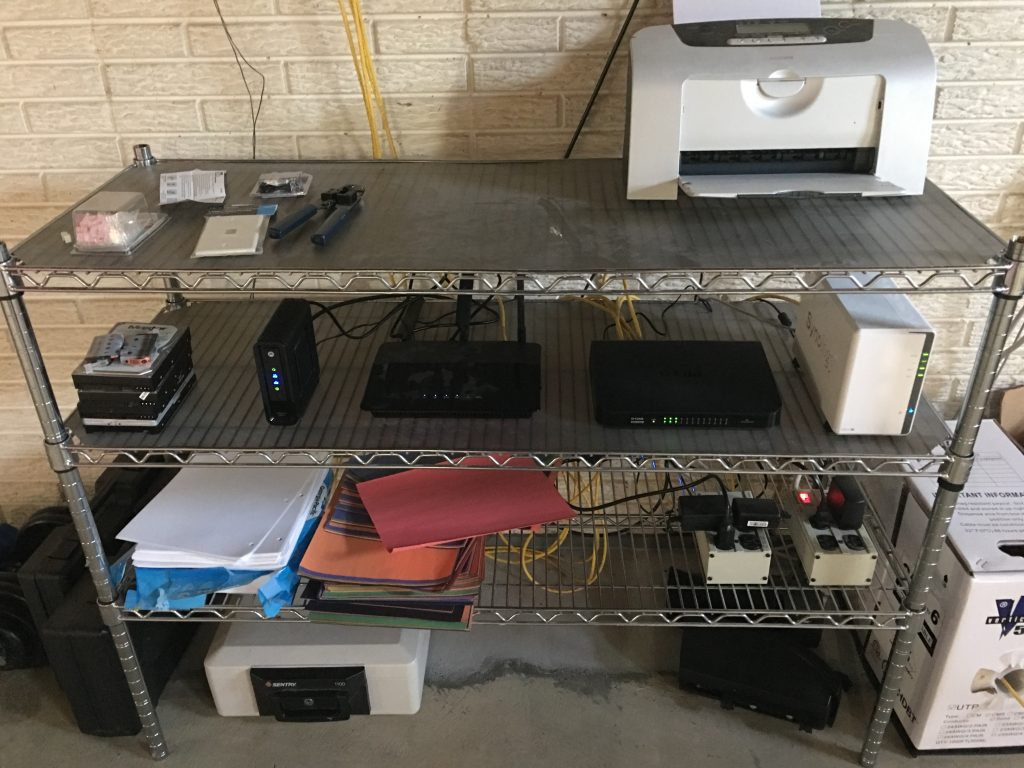
The other end was then terminated at the router. For simplicity, I just crimped it down into an RJ45 plug, though maybe one day I’ll get a proper patch panel installed.
Final notes:
If possible, use a dedicated Ethernet switch, rather than the router’s internal switch. Chances are the router’s switch doesn’t have as much resources dedicated to the switch part. Also, I was going to run out of ports anyway.
Every time the connection hops between devices, you lose throughput. I opted to only run a single wire to each drop, and then connect another switch to give me the ports I needed. Professional installations use one main switch and run however many wires are needed to each drop. I didn’t want to drill that many holes, or deal with that much wire. But the consequence was that my 760 Mbs connection dropped to a little more than 450 when I tested a file copy to the NAS, which sent the signal through 2 switches. Offhand it looks like you lose half of the throughput for each jump, but that’s only based off of two hops so I don’t know how that actually scales. Still, each device is guaranteed that much static bandwidth, and half a gig isn’t too shabby.
Despite the drawbacks, the connections are solid. I’ve even taking to plugging my work laptop into the Ethernet to speed up the VPN, with much success. And besides, all this tech does look damn cool.
–Simon